What are we trying to build?
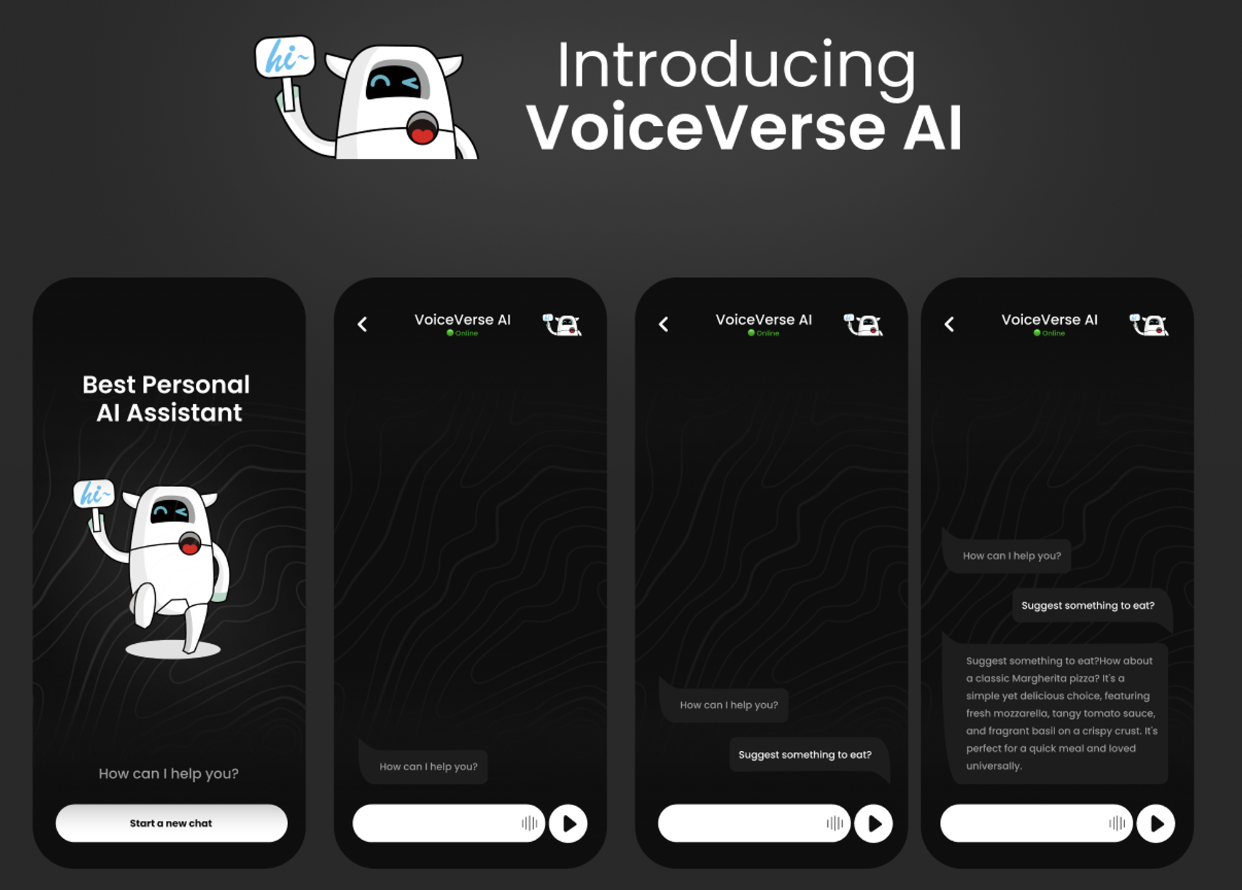
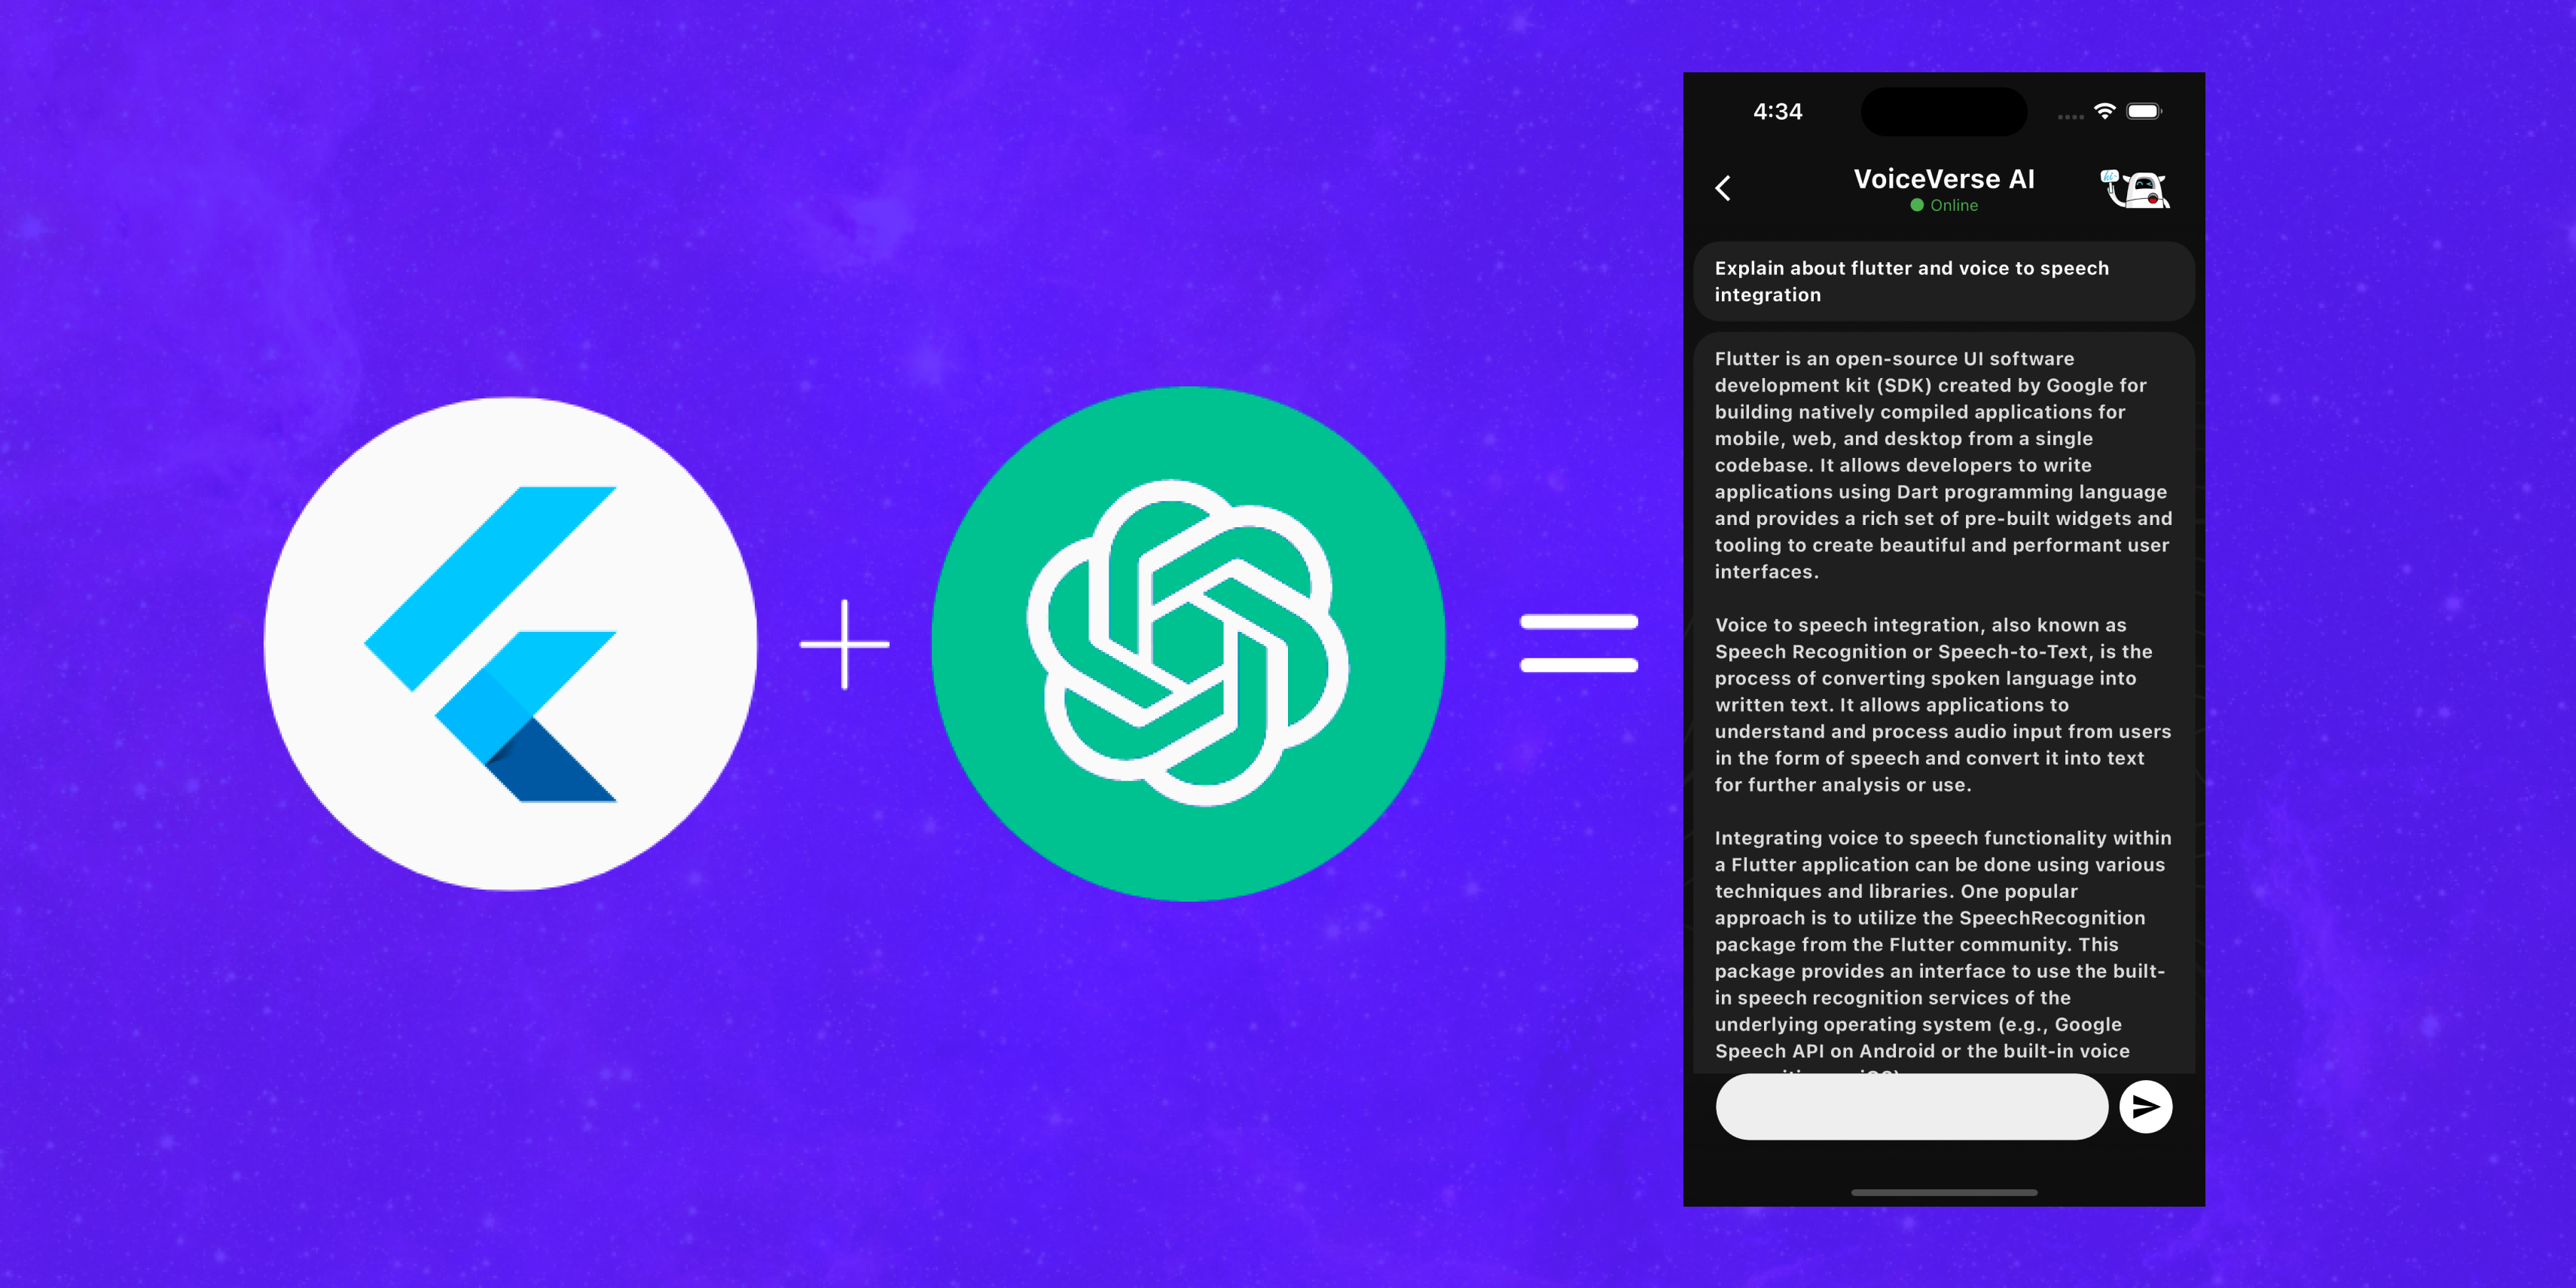
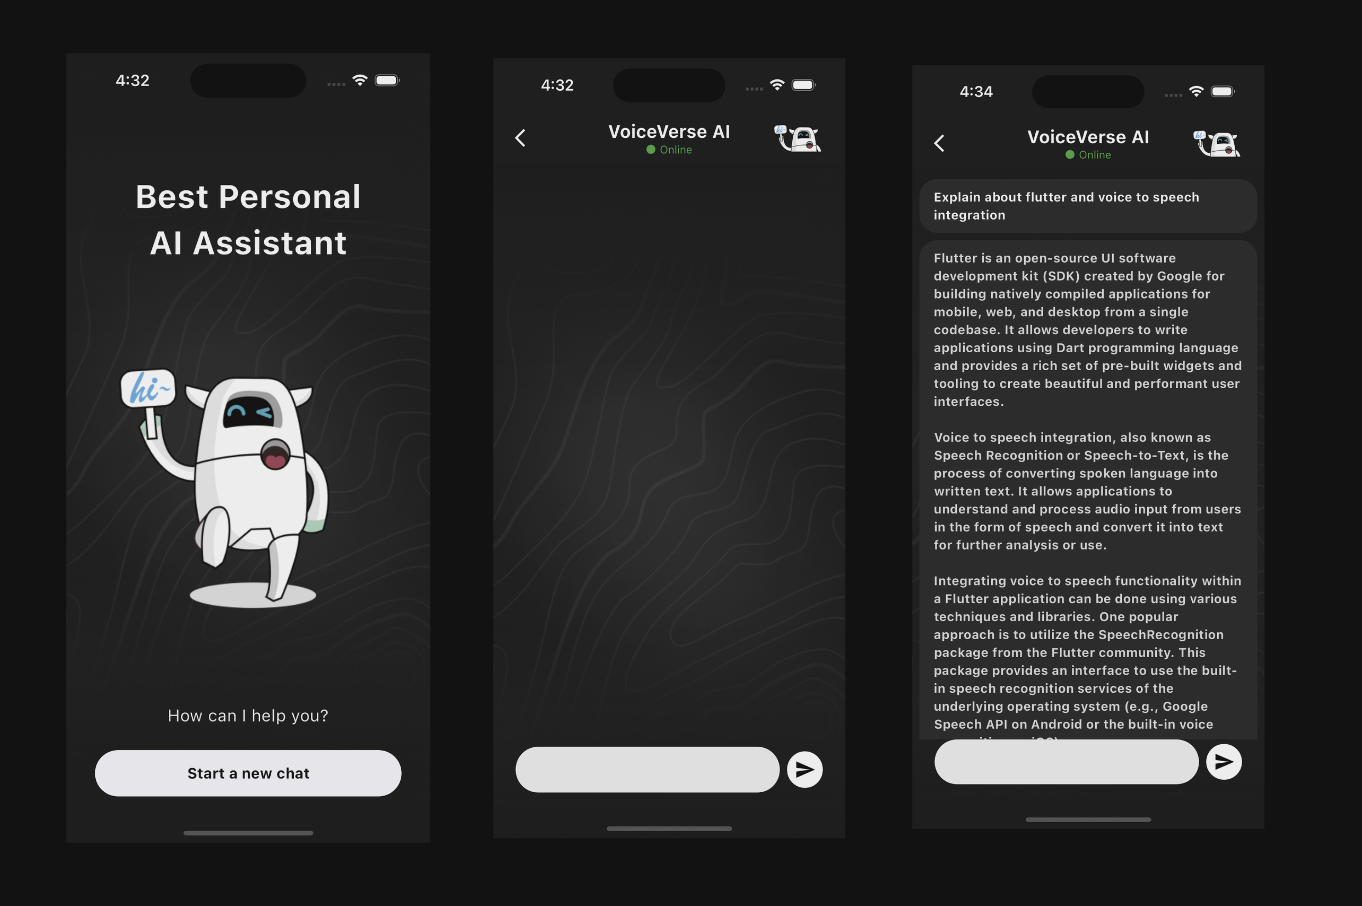
What will we build at the end of this tutorial
In the era of digital communication, chat applications have become a fundamental tool for personal and professional interaction. The integration of AI-driven conversational agents into these apps has opened up new possibilities for enhancing user experience. This article outlines the development process of a simple chat application using Flutter, a popular open-source UI software development kit by Google, and the OpenAI ChatGPT API, which allows for rich, AI-powered conversations.
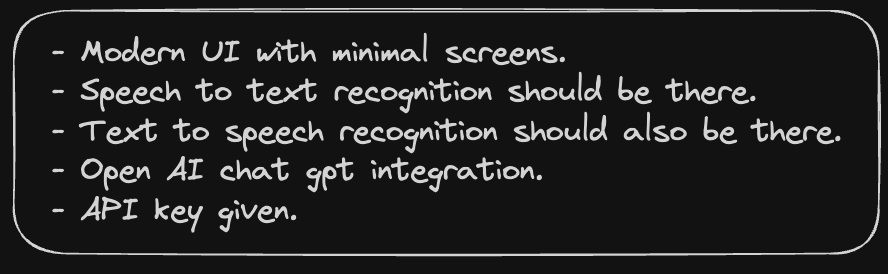
Features I tried to achieve with this -
What is Flutter?
Flutter is a framework made by Google. It is used to build applications that are supported on multiple platforms such as iOS and Android. You only need to write one set of code.
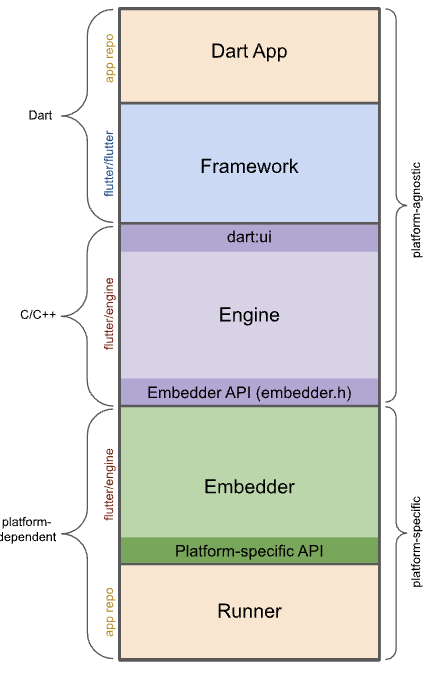
Let’s dive into how a Flutter app works -
- Dart App:
- Puts together different parts (widgets) to create the app's look.
- Handles the app's main functions.
- Made and controlled by the person who creates the app.
- Framework:
- Offers tools to make high-quality apps (like widgets and ways to detect touches and gestures).
- Turns the app's design into a displayable scene.
- Contains the source code for these tools.
- Engine:
- Makes the displayable scenes appear on the screen.
- Handles the basic operations of the app (like graphics and text).
- Connects the app's functions to the system it's running on.
- Contains source code for these operations.
- Embedder:
- Works with the computer or device's operating system for services like showing things on screen and responding to user actions.
- Manages how the app responds to user actions.
- Provides ways to include these functions in apps.
- Contains the source code for this integration.
- Runner:
- Puts everything together into a package that can run on the device.
- Part of the initial app setup was made by the app developer.
In summary, these parts work together to create and run a Dart app, each handling different aspects from the app's look and functions to its interaction with the device it runs on.
Initial Setup and Configuration
The first step in creating our chat application was setting up a new Flutter project. Flutter provides a fast development framework for building high-quality, natively compiled applications for mobile, web, and desktop from a single codebase. After installing Flutter and setting up the development environment, we initialized a new project using the command line:
flutter create chat_gpt_app
cd voiceverse
Integrating Dependencies
Our application required the http package to facilitate network requests to the OpenAI API. We added this dependency to our pubspec.yaml file to ensure our app could perform HTTP POST requests, essential for sending and receiving messages from the ChatGPT model.
name: voiceverse
description: "A new Flutter project."
publish_to: 'none'
version: 1.0.0+1
environment:
  sdk: '>=3.2.4 <4.0.0'
dependencies:
  flutter:
    sdk: flutter
  cupertino_icons: ^1.0.2
  http: ^1.2.0
  flutter_tts: ^3.8.5
  speech_to_text: ^6.6.0
dev_dependencies:
  flutter_test:
    sdk: flutter
  flutter_lints: ^2.0.0
flutter:
  uses-material-design: true
  assets:
    - assets/
After adding the dependency, we ran flutter pub get to install it.
Developing the Chat Service
We created a Dart file named chat_service.dart to encapsulate the logic for interacting with the OpenAI API. This service was responsible for crafting the API requests, including setting the appropriate headers and the request body with the user's message, and parsing the response from the ChatGPT model. A crucial step was ensuring the correct use of the API endpoint and model, initially targeting the v1/completions endpoint before realizing the need to switch to v1/chat/completions for chat-specific interactions.
// Example snippet from chat_service.dart
final String apiUrl = '<https://api.openai.com/v1/chat/completions>';
// Function to send message to OpenAI and receive response
Building the User Interface
The main.dart file was updated to include a user-friendly interface, allowing users to input their messages and view responses. The UI comprised a simple text input field and a send button. Messages were displayed in a scrollable list, differentiating between the user's messages and the bot's responses for clarity.
//main.dart
import 'package:flutter/material.dart';
import 'package:voiceverse/screens/initial_page.dart';

void main() {
  runApp(const MyApp());
}

class MyApp extends StatelessWidget {
  const MyApp({super.key});
  @override
  Widget build(BuildContext context) {
    return MaterialApp(
      debugShowCheckedModeBanner: false,
      title: 'Flutter Demo',
      theme: ThemeData(
        colorScheme: ColorScheme.fromSeed(seedColor: Colors.deepPurple),
        useMaterial3: true,
      ),
      home: InitialPage(),
    );
  }
}
//initial_page.dart
import 'package:flutter/material.dart';
import 'package:voiceverse/screens/chat_screen.dart';

class InitialPage extends StatefulWidget {
  const InitialPage({super.key});

  @override
  State<InitialPage> createState() => _InitialPageState();
}

class _InitialPageState extends State<InitialPage> {
  @override
  Widget build(BuildContext context) {
    return Scaffold(
      body: Container(
        decoration: const BoxDecoration(
          image: DecorationImage(
            image: AssetImage('assets/bgd.png'), // Replace with your image path
            fit: BoxFit
                .cover, // This will cover the whole container, you might want to adjust it based on your needs
          ),
        ),
        child: Column(
          children: <Widget>[
            SizedBox(height: 130),
            Text(
              'Best Personal            AI Assistant',
              style: TextStyle(
                color: Colors.white,
                fontSize: 35,
                fontWeight: FontWeight.bold,
              ),
              textAlign: TextAlign.center,
            ),
            Expanded(
              child: Image.asset(
                'assets/robo.png', // Replace with your robot image asset
                height: MediaQuery.of(context).size.height * 0.5,
              ),
            ),
            Text(
              'How can I help you?',
              style: TextStyle(color: Colors.white, fontSize: 18),
              textAlign: TextAlign.center,
            ),
            SizedBox(height: 24),
            ElevatedButton(
              style: ElevatedButton.styleFrom(
                minimumSize: Size(331,
                    50), // double.infinity is the width and 50 is the height
                primary: Colors.white, // Background color
                onPrimary: Colors.black, // Text Color (Foreground color)
              ),
              onPressed: () {
                Navigator.push(
                  context,
                  MaterialPageRoute(builder: (context) => ChatPage()),
                );
              },
              child: Text(
                'Start a new chat',
                style: TextStyle(fontSize: 16, fontWeight: FontWeight.bold),
              ),
            ),
            SizedBox(height: 50),
          ],
        ),
      ),
    );
  }
}
//chat_screen.dart
import 'package:flutter/material.dart';
import 'package:voiceverse/controllers/chat_service.dart';
import 'package:voiceverse/widgets/app_bar.dart';

class ChatPage extends StatefulWidget {
  @override
  _ChatPageState createState() => _ChatPageState();
}

class _ChatPageState extends State<ChatPage> {
  final TextEditingController _controller = TextEditingController();
  final ChatService _chatService = ChatService();
  List<Map<String, dynamic>> _messages = [];

  void _handleSend() async {
    final text = _controller.text.trim();
    if (text.isNotEmpty) {
      setState(() {
        _messages.add({"role": "user", "text": text});
      });
      _controller.clear();

      final response = await _chatService.sendMessage(text);
      setState(() {
        _messages.add({"role": "bot", "text": response});
      });
    }
  }

  @override
  Widget build(BuildContext context) {
    return Scaffold(
      appBar: CustomAppBar(),
      body: Container(
        decoration: const BoxDecoration(
          image: DecorationImage(
            image: AssetImage('assets/bgd.png'), // Replace with your image path
            fit: BoxFit
                .cover, // This will cover the whole container, you might want to adjust it based on your needs
          ),
        ),
        child: Column(
          children: [
            Expanded(
              child: ListView.builder(
                padding: EdgeInsets.all(8),
                itemCount: _messages.length,
                itemBuilder: (context, index) {
                  final message = _messages[index];
                  bool isUserMessage = message['role'] == 'user';
                  return Align(
                    alignment: isUserMessage
                        ? Alignment.centerRight
                        : Alignment.centerLeft,
                    child: Container(
                      margin: EdgeInsets.symmetric(vertical: 4),
                      padding:
                          EdgeInsets.symmetric(vertical: 10, horizontal: 16),
                      decoration: BoxDecoration(
                        color: isUserMessage
                            ? Color.fromARGB(255, 32, 31, 31)
                            : Color.fromARGB(255, 32, 31, 31),
                        borderRadius: BorderRadius.circular(20),
                      ),
                      child: Text(
                        message['text'],
                        style: TextStyle(
                          color: isUserMessage
                              ? Colors.white
                              : Color.fromARGB(255, 220, 220, 220),
                          fontWeight:
                              isUserMessage ? FontWeight.bold : FontWeight.bold,
                        ),
                      ),
                    ),
                  );
                },
              ),
            ),
            Padding(
              padding:
                  const EdgeInsets.only(left: 25.0, right: 25.0, bottom: 50),
              child: Row(
                children: [
                  Expanded(
                    child: Container(
                      height: 50,
                      child: Center(
                        child: TextField(
                          controller: _controller,
                          decoration: InputDecoration(
                            border: OutlineInputBorder(
                              borderRadius: BorderRadius.circular(30),
                              borderSide: BorderSide.none,
                            ),
                            filled: true,
                            fillColor: Colors.grey[200],
                          ),
                        ),
                      ),
                    ),
                  ),
                  SizedBox(width: 8),
                  CircleAvatar(
                    backgroundColor: Colors.white,
                    child: IconButton(
                      icon: Icon(Icons.send, color: Colors.black),
                      onPressed: _handleSend,
                    ),
                  ),
                ],
              ),
            ),
          ],
        ),
      ),
    );
  }
}
Handling API Communication
One of the challenges encountered during development was ensuring the correct API endpoint was used. Initially, we mistakenly used the v1/completions endpoint, leading to errors when attempting to interact with the chat model. The error messages provided by the OpenAI API were instrumental in guiding us to switch to the correct v1/chat/completions endpoint, specifically designed for conversational models.
Another crucial aspect was error handling. Early versions of the application did not provide clear feedback on failed API requests, making debugging difficult. By enhancing the error logging within the ChatService class, we could quickly identify and resolve issues, such as incorrect API keys or malformed request bodies.
//chat_service.dart
import 'dart:convert';
import 'package:http/http.dart' as http;

class ChatService {
  final String apiKey = 'YOUR_OPENAI_KEY';
  final String apiUrl = '<https://api.openai.com/v1/chat/completions>';

  Future<String> sendMessage(String message) async {
    final uri = Uri.parse(apiUrl);
    try {
      final response = await http.post(
        uri,
        headers: {
          'Content-Type': 'application/json',
          'Authorization': 'Bearer $apiKey',
        },
        body: jsonEncode({
          'model': 'gpt-3.5-turbo', // Adjust model name if necessary
          'messages': [
            {"role": "user", "content": message},
          ],
        }),
      );

      print('Response status: ${response.statusCode}'); // Print status code
      print('Response body: ${response.body}'); // Print the raw response body

      if (response.statusCode == 200) {
        final data = json.decode(response.body);
        String botResponse = data['choices'][0]['message']['content'].trim();
        print('Bot response: $botResponse'); // Print the bot's response
        return botResponse;
      } else {
        throw Exception('Failed to load response: ${response.statusCode}');
      }
    } catch (e) {
      print('Error sending message: $e');
      rethrow;
    }
  }
}
Testing and Iteration
Throughout the development process, iterative testing was key. The Flutter hot reload feature significantly sped up the process, allowing us to see changes in real-time and quickly adjust the UI and logic. We encountered a learning curve in understanding the specifics of the ChatGPT API, particularly the structure of requests and responses suitable for chat applications. Through trial and error, and with careful attention to the API documentation, we refined our application to ensure a smooth user experience.
Conclusion
The development of a chat application with Flutter and the OpenAI ChatGPT API was a rewarding experience that highlighted the importance of understanding API documentation, error handling, and the power of Flutter for rapid app development. The final product is a testament to the capabilities of modern development tools and APIs, offering a glimpse into the future of AI-powered communication applications. This project not only provided valuable insights into working with AI and Flutter but also showcased the potential for developers to create engaging and intelligent applications with relative ease.